Worms : Evolved 2
Designed by Kieran Millar (Melon)
Version 1.0 - Last updated 07/10/08
Contents :
1 - Version history
2 - A brief overview
3 - Quick guide summary
4 - Starting a game
5 - Weapons and utilities list
6 - Shopping list for buying weapons
7 - Playing the game
8 - Land damage, worm pushing and wind movement
9 - Mines, oil drums, crates, donor cards and poisoned worms
10 - Sudden Death
11 - Previous games
1. Version history
10/10/08 - v1.0 - First release.
2. A brief overview
This game was designed to try and simulate as much of a Worms game as possible while being played by many players across a forum. It tries to incorporate land damage and random landscapes and other such features that are popular in the Worms series, while remaining simple enough to be played by anybody. Any suggestions and ideas are very welcome.
Please note that although every effort has been made to make the game as similar to Worms as possible, some things have been altered, simplified, added or removed for fun or simplicity's sake.
The game is played across a 15x15 grid where worms can move and fire weapons. Each square in the grid is also given a "land damage" value ranging between 0 and 8, where 0 represents open water in which worms will drown. Explosive weapons will lower this value, eventually creating holes of open water as the game progresses.
The game is played in teams, with a maximum of 18 worms on the grid, and a maximum of 6 players. Players take turns, and up to 3 worms in a player's team may move/fire in their turn.
The game will end when only one team remains. In the event that game takes too long or a stalemate is reached, Sudden Death will occur.
3. Quick guide summary
This section is designed to give you a quick summary on the game essentials, so that you can begin playing as soon as possible.
- You have a varying amount of points to spend on weapons and utilities depending on the number of players. Use the shopping list (section 6) to spend your points.
- PM your list of weapons to me to sign up for the game.
- When all the players are ready, a map will be randomly generated and your worms will be randomly placed upon it.
- When it is your turn, a maximum of 3 worms on your team are allowed to act. This means that those worms are allowed to move up to 3 spaces each, use utilities, and fire a single weapon. You may post your turn on the board, but it is advised you PM me your move, as any invalid moves will need to be resolved, and by posting you may give away information on what weapons you own. You are allowed to continue to move after firing.
- PM me if you wish to collect a crate, and I will PM you with the crate contents.
- You have limited time to make your move (prefferably within 24-48 hours, although this is pretty lenient). If you fail to take your turn you will have it taken for you.
- Each worm has 150 health to start with and if all your worms die you are out of the game. The game ends when only one team remains, or everybody dies due to some crazy suicide tactic.
- If Sudden Death occurs, the "land damage" value will decrease after every round (full cycle of player's turns). Try to imagine the water rising instead, it's the same effect.
4. Starting a game
In order to begin a game, players need to sign up for the next game. The signing up period will only occur between games. Preference will be given to those who did not play in the last game, and to the winners of the last game. Otherwise it is based on a "First come first served" basis.
In order to sign up, a player will need to buy weapons for his team to use. Each player points in which to spend on standard weapons and utilities. In addition, he is allowed to select one of the team weapons at no extra cost. Once the game has started, a player cannot buy/sell weapons, so they must be chosen carefully, and any unspent points will be lost.
Once the player has determined what weapons to choose, his selections must be PMed to me, not posted in the forum.
This is important. During the game the other players should not know what weapons you have.
Once enough players have signed up, the game will begin.
First, a map is randomly generated and worms and objects are randomly placed on it. Finally, the turn order is randomly generated. Then the game begins with the first player taking their turn.
5. Weapons and utilities list
This section details all of the weapons and utilities in the game. At the end is a shopping list summarising the cost of weapons for when players buy them before the game. When buying weapons, you may only buy the weapons and utilities in the shopping list, and you may choose 1 Team weapon. Remember that the points you have to spend will vary with the number of players in the game. Each player is also given infinite amounts of prods and handguns.
RNG indicates how far the weapon can fire.
DMG indictes the range of damage each shot will do. In the event that more than 1 square is affected, details will be noted.
LND indicates the land damage done by the weapon. This also indicates how far the worm will be pushed by the weapon, unless stated otherwise.
In addition, weapons can be categoriesed into a few types. Projectile weapons may fire diagonally and over worms, oil drums and crates, but have a low range. Guns can only fire in a straight line, but typically have a long range. They may not fire over worms, oil drums and crates unless a jet pack is used.
STANDARD WEAPONS - Each player can fire one of these during their team's turn.
PROD
RNG = 1
DMG = 0
LND = 0 but will push the enemy 1 square away.
The ultimate insult weapon, this comes in infinite supply and will push enemy worms forward 1 square. It does no damage on it's own, but can push worms into water and more besides. It is also the only weapon that can move oil drums without blowing them up! Prodding a mine will set it off, but it will only detonate after it has moved, leaving you safe from harm.
HANDGUN
RNG = 8 in a straight line only, no diagonals.
DMG = 20
LND = 0
The handgun also comes in infinite supply. It does little damage, but has excellent range and can be used to kill worms with low health that are far away.
Like all guns, you may only fire on the first worm, oil drum or crate in your line of sight unless a jet pack is used.
BAZOOKA
RNG = 3, affected by the wind
DMG = 40-50
LND = 1
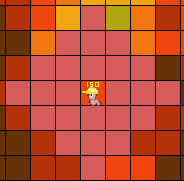
The bazooka is affected by the wind. When the wind blows, the area in which the bazooka can be shot will be treated as if the player has been moved in the direction and strength of the wind.
For example: This diagram shows the area of effect of the bazooka with no wind
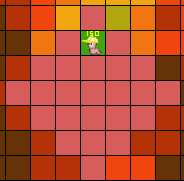
And this one shows the area of effect with the wind blowing South at a strength of 2
GRENADE
RNG = 3
DMG = 40-50
LND = 1
The grenade is identical to the bazooka, except that it is not affected by the wind.
SHOTGUN
RNG = 8 in a straight line only, no diagonals.
DMG = 25 + 2 shots.
LND = 0
The shotgun can fire 2 shots in one turn, and at different targets. You can even move between shots, provided that you still have some movement left in your turn.
Like all guns, you may only fire on the first worm, oil drum or crate in your line of sight unless a jet pack is used.
LONGBOW
RNG = 8 in a straight line only, no diagonals.
DMG = 15 + 2 shots.
LND = 0, but will push the target 2 squares in the direction of the shot.
The longbow can also fire 2 shots in one turn, and at different targets. You can even move between shots, provided that you still have some movement left in your turn. However, unlike the shotgun, it is designed to push worms rather than damage them.
As pushed worms slide across the land rather than fly through the air in this case, any mines they come across will be pushed with them, and will explode when the worm comes to rest. The worm can also not be pushed into oil drums and will stop instead. They will also slide into and collect crates and donor cards rather than fly over them.
Like all guns, you may only fire on the first worm, oil drum or crate in your line of sight unless a jet pack is used.
KAMIKAZE
RNG = 7 in a straight line only, no diagonals.
DMG = 30 or 40-50 on the last square
LND = 1 on the final square only but enemies on all affected squares will be pushed 3 squares away.
The kamikaze is a suicide weapon, and the user WILL DIE when using it. The player will move in the selected direction until he cannot move further due to reaching the edge of the map or because he has moved 7 squares. Any enemies in the path of the kamikaze will be pushed in the direction of the shot, and any that are on the final square will recieve more damage. Crates can even be collected during the attack for his team mates to use! A worm that dies by using a Kamikaze will not drop a donor card.
MINE
RNG = 1
DMG = various
LND = various
Mines can be placed around the landscape to be set as traps, or directly onto an enemy worm. The range when placing them is 1, but the enemy needs to be in the same square to set them off. Mines can also be pushed by weapons, although the kamikaze and prod will set them off although they will detonate after they have been moved.
There are 3 types of mine, and the player may choose which type he wishes it to be when he places one.
Damage mines - These mines have the following stats: DMG = 40-50 LND = 1 in a random direction.
Shockwave mines - These mines have the following stats: DMG = 0 LND = 0, but all objects will be pushed 4 squares away in a random direction on the occupying square and 2 away from the mine on the surrounding 8 squares.
Poison mines - These mines have the following stats: DMG = 0 LND = 0. These mines release a gas cloud that poisons any worm on the occupying and surrounding 8 squares.
As the mine is a droppable weapon, you are given 2 extra squares to move in once you have placed the weapon to allow you to retreat. This is doubled to 4 with fast walk activated.
DYNAMITE
RNG = 1
DMG = 60-75 on placed square, 35 on surrounding 8 squares
LND = 2 on placed square, 1 on the surrounding 8 squares
Dynamites are highly powerful close range weapons. Use them wisely. When placed directly on a worm, the worm will be pushed in a random direction.
As the dynamite is a droppable weapon, you are given 2 extra squares to move in once you have placed the weapon to allow you to retreat. This is doubled to 4 with fast walk activated.
SHEEP
RNG = 15 max in a straight line, no diagonals.
DMG = 60-75 on exploding square, 35 on surrounding 8 squares
LND = 2 on exploding square, 1 on the surrounding 8 squares
The sheep is a great weapon for large long range damage, but isn't without it's failings. Sheep cannot be detonated manually, but thay are likely to detonate automatically when they come into contact with a worm, or move too far.
A sheep will automatically jump when it reaches water. Jumping has the effect of completely ignoring one square, and this square is ignored for range purposes also.
Once it comes into contact with a worm, it will have an 80% chance of exploding. It will jump over the worm if it fails in this case.
If it comes into contact with an oil barrel it will have an 80% chance of jumping over it. It will explode if it fails in this case.
If it runs out of movement range it will explode.
A sheep will collect any crate it comes into contact with.
AIR STRIKE
RNG = ALL
DMG = 35 per missile (5 missiles)
LND = 1 on all affected squares.
The airstrike will drop a missile on 5 squares in a row. All of the selected squares must be in a straight line and next to each other, but may be anywhere on the board.
HOMING MISSILE
RNG = ALL
DMG = 40-50
LND = 1, worms will be pushed in a random direction.
The homing missile will cause damage to any selected grid square.
GAS GRENADE
RNG = 3
DMG = 0
LND = 0
The gas grenade will poison any worm in it's landing square and on all surrounding 8 squares. It does no land damage however.
TELEPORT
The teleport will move your worm onto any unoccupied grid square. It's not technically a weapon, but unlike the other utilities, using it will end your turn, so it's categorised here instead.
TEAM WEAPONS - You are allowed to choose one of the following weapons for free when signing up.
SUPER SHEEP
RNG = ALL
DMG = 60-75 on placed square, 35 on surrounding 8 squares
LND = 2 on placed square, 1 on the surrounding 8 squares
The super sheep is basically a homing missile with the power of a dynamite and is used to cause large damage on any square on the board. Use it wisely, it's a fantastic weapon for Sudden Death. Like the dynamite, any worm on the target square will be pushed in a random direction.
MAD COW
RNG = 15 in a straight line only, no diagonals
DMG = 48-60 on exploding square, 20 on surrounding 8 squares
LND = 2 on placed square, 1 on the surrounding 8 squares
A mad cow is not as powerful as a sheep, but can still cause large damage if used correctly. A mad cow will run in a straight line from your worm towards the enemy. It will explode if it collides with a worm or oil barrel, and will collect any crates. If it falls into water it will drown and not explode.
You can actually launch up to 4 mad cows in any one turn, provided you have enough of them. You can launch them in the same direction or even in different directions, and if you have any movement left, you are even allowed to move between launching them. If more than 1 cow is launched, then following cows will be launched only when the previous one has exploded and worms have been pushed, for simplicities sake.
When combined with fast walk, a worm with mad cows is a formidable opponent, due to his ability to cause damage across the board.
OLD WOMAN
RNG = 5 max in a straight line only, no diagonals
DMG = 60-75 on exploding square, 35 on surrounding 8 squares
LND = 2 on exploding square, 1 on the surrounding 8 squares
The old woman will strike fear into any woman she comes across. She may appear harmless, strolling casually and moaning about the price of cheese, but is strapped with explosives and is a mean pickpocket.
The old woman will walk in a straight line. If she walks into water she will drown without exploding. If she comes into contact with an oil barrel she will turn around. She will also collect crates. If she runs out of movement she will explode.
But that's not all! When she comes into contact with a worm, not only will she explode, but she will also steal 3 weapons or utilities from the opposing worm's team's weapon list and transfer them to your team. If she comes into contact with one of your worms however, she will steal 3 of your team's weapons or utilities, which will be lost forever. The way in which weapons are stolen is identical to the way donor cards are produced. Also note that weapon in this case stands for each individual ammo, as opposed to all ammo for 3 weapons.
The old woman is the perfect choice for those who are left in a one-on-one situation near the end of the game, as it can cripple your enemy's ability to attack.
MINIGUN
RNG = 3 in a straight line, no diagonals
DMG = 125
LND = 0, but worms will be pushed 4 squares away
Although it does not have the range or height of the other gun weapons, the minigun has many advantages. First of all is that it does a guaranteed 125 points of damage. Second is that it can push the worm by 4 squares, allowing them to be pushed into mines or water. With the minigun you are guaranteed to deal huge damage to a worm. Simple and stress free.
As pushed worms slide across the land rather than fly through the air in this case, any mines they come across will be pushed with them, and will explode when the worm comes to rest. The worm can also not be pushed into oil drums and will stop instead. They will also slide into and collect crates and donor cards rather than fly over them.
Like all guns, you may only fire on the first worm, oil drum or crate in your line of sight unless a jet pack is used.
HOLY HAND-GRENADE
RNG = 3
DMG = 70-100 on placed square, 35-50 on the 8 surrounding squares and 15 damage on the 16 squares surrounding them
LND = 3 on the placed square, 2 on the 8 surrounding squares and 1 on the surrounding 16 squares.
The Lord's preffered weapon, and you can see why. The Holy Hand-Grenade will affect a whopping 25 squares of the board, and will push worms in all directions. Although the damage is large in the centre, it quickly diminishes with distance, and the damage varies quite considerably. Therefore, the weapon is mainly used for large groups of worms and creating a large hole. It is a waste to use it on only one worm. Be sure to keep some movement to get away from the explosion, otherwise you can easily end up hurting yourself!
The Holy Hand-Grenade is perfect for those who like big flashy effects and earth-shaking explosions.
SUPER WEAPONS - These babies can only be found in crates. They are very powerful and can completely turn the tide of battle. Make sure you use them with care though as they can be a double edged sword.
NUCLEAR BOMB
The nuclear bomb requires no aiming skill whatsoever. When you launch the bomb, every worm on the board except for the one using it will be poisoned, and that includes team-mates. Not only that, but all of the squares will lose 2 points of "land damage". This weapon can be used to flood ares and drown worms, or just create large scale health loss.
ARMAGEDDON
RNG = ALL
DMG = 60-75 on exploding square, 35 on surrounding 8 squares + 25 shots
LND = 2 on exploding square in a random direction, 1 on surrounding 8 squares.
It's the end of the world as we know it! Upon activating this weapon, 25 small meteorites will fall from the sky and land on random squares. Any meteorites that land in water will sink without exploding. This weapon will cause large scale random damage to the entire board, and is very risky to use. It could even wipe out your entire team, or even all of the players, forcing a draw. It can also completely alter the landscape, so you can throw any future tactics you planned out of the window.
Don't say I didn't warn you....
CONCRETE DONKEY
The god of the lightsider worms, the concrete donkey should be worshipped or else it will smite all non-believers! The concrete donkey is dropped from the sky and will smash through the landscape, killing all those that it falls on. The effect of this in the game is that a 3x3 square on the board will be turned into water, and any oil drums and crates will expode. Everything else will drown. This will create a giant sink-hole, so just be careful if one of your team-mates is standing next to it.
SUPER BANANA BOMB
RNG = 3
DMG = 60-75 on placed square, 35 on surrounding 8 squares per cluster + 1 main bomb and 4 clusters
LND = 2 on exploding square, 1 on the surrounding 8 squares per cluster
The soft friut of doom! The Super Banana Bomb will cause masive damage over a large spread area. The banana is thrown like a normal grenade, but will explode with the power of a dynamite. Not only that, but it will then split into 4 more identical bananas. These 4 bananas will be placed randomly in the 16 squares surrounding the initial explosion at range 2, and then explode again. Although the damage can therefore be quite random, it is more than made up for in area of effect. The initial worm that was hit can even be hit multiple times if clusters land on his new position!
Note that like other grenade weapons, the super banana bomb has a range of 3, so you may end up hurting yourself if you're not careful.
SHEEP STRIKE
RNG = ALL
DMG = 60-75 on placed square, 35 on surrounding 8 squares per sheep (5 sheep)
LND = 2 on placed square, 1 on the surrounding 8 squares per sheep
Lamb chops incoming! As if the sheep didn't get treated badly enough before, now they are dropped from a plane too! This strike weapon will drop 5 sheep in a straight line onto the board. The sheep can't be dropped diagonally and there will be a gap of 1 square between each sheep, meaning that the sheep will be dropped in a line covering 9 squares. Each explosion also damages 9 squares, meaning that this weapon can cause damage in a 3x11 rectangle! Any worm caught in one of the surrounding squares where a sheep does not land will only recieve one load of 35 damage for simplicities sake. The same goes for land damage.
COLLECTABLE UTILITIES - These utilites can be stored in your weapons list and used during a turn. There is no limit to how many you can activate in one turn. Please note that these utilities only affect the worm that uses them.
JET PACK
The jet pack allows you to move your worm without any restrictions for other objects and gives you more height for longer shots. In game terms, you can safely move over mines, water, oil drums and other worms. Ending your turn on top of a worm or oil drum is not allowed. Ending your turn on a mine will set it off, and ending your turn on the water will drown your worm. In addition, gun and projectile weapons have their RNG increased by 1. The affected weapons are as follows: Handgun, Bazooka, Grenade, Shotgun, Longbow, Gas Grenade, Minigun, Holy Hand Grenade and Super Banana Bomb. Note that gun weapons can shoot over worms, oil drums and crates when a jet pack is used.
Rather oddly, you can combine this with the fast walk utility.
FAST WALK
The fast walk will double your movement for the turn from 3 to 6. It will also double the extra retreat movement gained from using a mine or dynamite from 2 to 4. Rather oddly, it can be combined with the jet pack utility.
BUBBLE TROUBLE
The ultimate defensive utility, the bubble trouble will create a defensive bubble on your current grid square when activated. This grid square will then be immune to most attacks, pushes and land damage, thereby preventing your worm from recieving any harm. You can use weapons from inside of the bubble, but any weapons trying to hit you will be absorbed by the bubble. The bubble is not completely immune however, as it will dissappear when your next turn starts, and is also not immune to all attacks. The prod, firepunch, mine and dynamite will be able to knock the user outside of the bubble, whereas the nuclear bomb and concrete donkey can sink it. Worms inside bubbles cannot be poisoned.
An unclaimed bubble trouble can be claimed by another worm by having them move into it.
INSTANT EFFECT UTILITIES - These utilites will activate as soon as you collect them.
DOUBLE DAMAGE
When this is collected, any weapons that the team uses during that turn will do double the damage, throw worms twice as far and do double the land damage. Even worms poisoned by a weapon that turn poison has double the effect. The area of effect of the weapon in unaffected, as are other utilities.
CRATE SPY
When a team collects this, they will be PMed the contents of every crate on the board. They will also be PMed the contents of a crate every time a crate appears. This will also tell players the contents of donor cards. Unlike the other utilities, once a player has collected this it will remain active for the rest of the game.
CRATE SHOWER
When this is collected, 5 crates will automatically appear on the board in random positions. The type of crate and it's contents for each crate is still determined in the same way, except a Crate Shower cannot spawn another Crate Shower.
6. Shopping list for buying weapons
The following list contains the price of all of the weapons that you can buy with your points. Remember that the prod and handgun come in infinite supply for free, and you can choose 1 Team Weapon for free also. You cannot buy an infinite supply of any weapon,except for the prod and handgun which are given for free.
The points you will have to spend depends upon the number of players:
2 PLAYERS : 160
3 PLAYERS : 155
4 PLAYERS : 145
5 PLAYERS : 130
6 PLAYERS : 120
First, you choose one and only one of these for free:
SUPER SHEEP
MAD COW x2
OLD WOMAN
MINIGUN
HOLY HAND-GRENADE
Then, you spend your points on these:
2pts - BAZOOKA
3pts - GRENADE
4pts - SHOTGUN
6pts - LONGBOW
7pts - KAMIKAZE
4pts - MINE
10pts - DYNAMITE
12pts - SHEEP
10pts - AIRSTRIKE
8pts - HOMING MISSILE
6pts - GAS GRENADE
5pts - TELEPORT
4pts - JET PACK
8pts - FAST WALK
8pts - BUBBLE TROUBLE
7. Playing the game
Once enough players have signed up and submitted their weapons list. The game will begin. Player's worms are randomly placed onto the landscape, along with 25 mines and 4 oil drums. The turn order is also randomly assigned. The first turn will then begin as normal.
This map is an example of the start of a game. (This picture is from an old version of the game. Changing it soon)
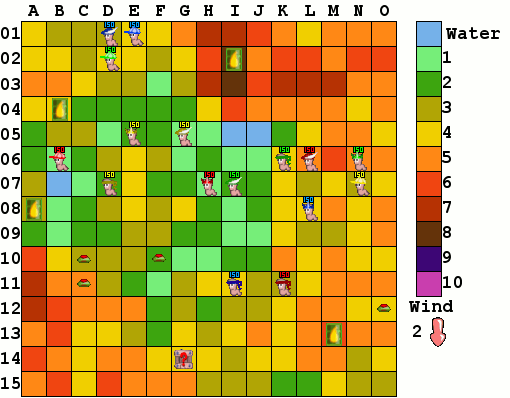
The grid is a view of the positions of the objects and players in the game. The grid squares are colour coded in accordance with the key to allow the players to see the layout of the land. On the right, underneath the key, is the wind strength, ranging from 0-3, and the direction as indicated by the arrow, if the strength is not 0. Which player each worm belongs to can be easily determined by the colour of their headgear. The health of the worm appears over their head.
At the beginning of each turn, there is a chance that a crate will drop on a random grid square. The crate can be a weapon crate, health crate, or utility crate. The player who's turn it is will be PMed a list of their current weapons. If they have crate spy then they will also be sent the contents of each weapon, utility crate and donor card on the map.Also, the wind may blow either North, East, South, or West, at a strength between 1 and 3, or it may not blow at all.
During each of their turns, each player is allowed to use up to 3 worms, and each can move up to 3 squares, not diagonally. This can increase if they use a Fast Walk utility or a mine or dynamite. The player cannot move through other worms, oil drums or across water, unless they are using a jet pack utility. It is up to each player to determine where they can move. They will be told by PM if their turn is invalid. If a player tries to move onto a mine, it will detonate instantly, ending his turn.
If a player wishes to pick up a crate, then PM me and I'll PM you to let you know what you picked up. That way, you may use the weapon that turn.
A player can use as many utilities during his turn as he likes.
A player may fire 1 weapon during his turn, although the Shotgun, Longbow and Mad Cow may allow multiple shots. A player may only move after he has fired if he still has movement left. Using a dynamite or mine will give the player extra movement after he has fired the weapon. It is up to the player to determine whether or not the weapon will hit the target.
In order to keep the game moving, each player will be given between 24-48 hours to PM his turn to me. If the player does not manage to submit a valid turn in this time, then his turn will be taken for him by me. You may post your turn inside the forum thread if you wish, but it may give away information on the weapons you have if the turn is invalid. If any invalid turns occur then the player will be notified, and will have until the end of the allowed turn time to re-submit a turn.
If you're stuck for whatever reason, then your turn will be skipped. A player may surrender during the game if they wish, in which case all of their worms will be removed from the board.
Once the player has submitted vaild turns, then the turn will be executed, and play will pass to the next player. If you wish to move after firing a weapon, you will need to notify me during your turn submission PM. Once a turn has been executed you cannot move your worm until your next turn.
A worm will die if it is knocked into water or it runs out of health points. If a worm runs out of health points, it will explode, also dropping a donor card (see section 9). Two of the player's weapons are placed inside the donor card, so the player will need to collect it on his next turn if he wishes to keep his weapons.
If all your worms die during the game, then you are out of the game.
It does not matter if you never got to take a turn, as you are out for the rest of this match.
If no player can move or hit each other, then the game will be declared a stalemate and Sudden Death will be forced. After a certain number of rounds, Sudden Death will occur anyway. See section 10 for more details.
When only 1 player remains, then that player wins the game and the sign-up period for the next game will begin. If the final turn kills all remaining players, then the game will be declared a draw. The sign-up period will still continue as usual.
8. Land damage, worm pushing and wind movement
This section is designed to tell you all of the specifics about these elements of the game. Although a lot of this information is not needed in order to play this game, it will hopefully remove any doubt on how things will behave at all possible opportunities.
When worms or mines are pushed by explosions, they will travel in the direction away from the shot unless the shot is a droppable or strike weapon, in which case the worm will be pushed in a random direction. If the direction from the shot is diagonal, then they will be moved diagonally, however, as the distance they are moved is treated similarly to how worms move normally, they will be moved either horizontally or vertically first, then in the apropriate direction. This means that in order to push a worm perfectly diagonally, the amount the worm is pushed must be an even number. In the event that it is odd, the worm will be moved horizontally first.
Worms and mines cannot be pushed off of the edge of the board. If they try to fall off of the board, then it is treated as there being an infinitely high wall surrounding the board. Similarly, worms and oil drums can only occupy free spaces. If a worm tries to land on another worm or an oil drum, then it will be moved one square in a random direction. If the square is still not free, it will continue to attempt to be randomly placed until it ends up in a free square. If a worm occupies the same square as a mine, the mine will explode. If a worm lands on a crate, then that worm will collect it, regardless of whether or not it is his turn. See the next section for more details about how mines will react to being pushed around.
When the wind blows, bazookas are affected. When firing a bazooka, you should imagine that your worm is not standing in it's current square, but in the square indicated by the strength and direction of the wind. So, for example, if the wind is pointing South at a strength of 2, then imagine your worm is standing 2 squares below his current position. This means you can hit a worm 5 squares below you, but only 1 square above you, as opposed to 3 either side if there is no wind. This will also change the direction that the bazooka shot travells, for pushing purposes.
9. Mines, oil drums, crates, donor cards and poisoned worms
A mine will explode if a worm tries to occupy the same square as it. The effect this has is equal to the Mine weapon shown above. A mine can be knocked exactly like worms can, and it will only be detonated if it is pushed using a kamikaze or prod. If a mine is placed or lands on a crate, then the crate will become booby trapped. Booby trapped crates appear identical to normal to normal crates, except that they will explode when a worm tries to collect itwith the same effects as a dynamite and the worm will not recieve the contained health/weapon/utility. Players will only be notified that it is booby trapped when it first becomes booby trapped. After that they will not be told again unless they have the crate spy utility. Multiple mines can occupy the same square. They will all explode at once if triggered, and the effects will be cumulative.
If an oil drum is shot, then it will explode like a Dynamite, except that the full 60-75 damage will apply to the 8 surrounding squares. This is because a worm cannot occupy the same square as the drum. Oil drums can be prodded without exploding, any other weapon will cause them to blow up.
At the beginning of a turn, there are probabilities that a crate will fall, the probabilities are:
Weapon crate = 50%
Health crate = 20%
Utility crate = 20%
No crate will fall = 10%
They will fall on a random empty square that is not water, if one still exists, otherwise they will not fall at all. If a worm picks up a health crate, then it will recieve 30 health points. If it picks up a utility crate, then it has an even probability of picking up a random utility. Weapon probabilities are different and are shown below:
Normal weapon = 80%
Team Weapon = 15%
Super weapon = 5%
The probabilty of getting a particular weapon in a particular category is even for each weapon in that category. Prods and handguns will never appear in a crate. The ammo of each weapon contained inside a crate will be 1 unless specified in the table below:
BAZOOKA - 3 ammo
GRENADE - 3 ammo
MINE - 2 ammo
GAS GRENADE - 2 ammo
MAD COW - 2 ammo
A crate can be shot just like an oil drum. If it is shot, then it explodes in an identical manner to an oil drum. However, if the crate contained either a Sheep, Super Sheep, or Sheep Strike, then a sheep will fly out an explode on one of the 8 surrounding squares. This has the same effect as one Super Banana Bomb cluster. The same applies if a worm tries to collect a booby trapped crate that originally contained a sheep weapon.
When a worm dies by losing all of its health (ie, not drowning), then it will explode. This explosion is identical to a dynamite, but of course two worms cannot occupy the same square, so the damage would be limited to 35 on a single worm. Not only that, but it will also drop a donor card. When this happens, two weapons from that team's inventory will be placed inside the donor card. Please note that this means 2 ammo, not the entire ammo for a 2 weapons. These weapons are effectively removed from the team's posession, unless they can reclaim the card by picking it up first. Each ammo has an equal chance of being placed into the donor card. Handgungs and prods will never be placed into a donor card. If the team does not have any available weapons, then a card will still be produced, but it will be empty. If when a worm dies and the explosion creates a water hole, then the donor card will be produced and will instantly drown, therefore making the team lose its weapons. Drowning worms will not remove weapons or create a donor card. A mine cannot occupy the same square as a donor card. If a donor card is shot, then it will not explode, but disintegrate, thereby losing the contained weapons forever. A worm that uses a Kamikaze will die but will NOT drop a donor card.
A poisoned worm will lose 5 health points at the beginning of each team's turn, until it reaches 1 health point. If a member of that team collects a health crate, then each worm on the team will have the poison removed, despite only the worm that collects the crate getting a health bonus. Poison effects are cumulative, so being poisoned twice will incur 10 points of damage each turn.
10. Sudden Death
Before a game begins, all players will be notified of how many 'rounds' will take place until Sudden Death. Rounds for this purpose will mean when every player has taken a turn, so rounds will be shorter when there are less teams. The number of rounds will vary, but will usually be 10 or less. When Sudden Death occurs, the water will rise by 1 after every round. Also, health crates will no longer fall, and will be replaced by either a utility or weapons crate at a 50% chance of either.
If every remaining worm is stuck and/or cannot hit each other, then a stalemate will be reached. In this case, all turns are automatically skipped until something of interest happens, usually this will be a crate dropping next to a worm that can collect it. Sudden death will still occur when it is reached in a stalemate, and in some cases a stalemate will ultimately result in the highest worm winning as all remaining worms drown. The purpose of a stalemate is to keep the game moving, as it would be pointless in waiting for somebody to submit a turn that is just 'skip turn' each time.
11. Previous games
None yet!
